Docker Setup and Dockerize an Application

What is Docker ?
Docker is an open platform to build, ship and run applications by wrapping them in “containers”.
What is “container” ? — A container is a runtime instance of an image — what the image becomes in memory when actually executed. It runs completely isolated from the host environment by default, only accessing host files and ports if configured to do so.
What is an “image” ? — An image is a lightweight, stand-alone, executable package that includes everything needed to run a piece of software, including the code, a runtime, libraries, environment variables, and config files.
Containers run apps natively on the host machine’s kernel. They have better performance characteristics than virtual machines that only get virtual access to host resources through a hypervisor. Containers can get native access, each one running in a discrete process, taking no more memory than any other executable.

Docker Setup
Docker setup is easy to do on Mac and Windows.

To install latest docker, follow the instruction at https://docs.docker.com/engine/installation/
Once installation is done check the docker version
$ docker -vOR$ docker --version
In case want to check the client and server version
$ docker version
Client:
..........................................................
..........................................................Server:
..........................................................
..........................................................
Run the hello-world container to test the installation
$ docker run hello-worldUnable to find image 'hello-world:latest' locallylatest: Pulling from library/hello-world9a0669468bf7: Pull completeDigest: sha256:cf2f6d004a59f7c18ec89df311cf0f6a1c714ec924eebcbfdd759a669b90e711Status: Downloaded newer image for hello-world:latestHello from Docker!This message shows that your installation appears to be working correctly.
To check if this container has been created, run below on the terminal :
$ docker container ps -aCONTAINER ID  IMAGE   COMMAND  CREATED   STATUS   PORTS   NAMES
d359aadd7e49 hello-world "/hello" 3 minutes ago Exited (0) 3 minutes ago                       fervent_ritchie
To check the images , run below one the terminal :
$ docker imagesREPOSITORY     TAG         IMAGE ID        CREATED            SIZE
hello-world   latest     725dcfab7d63    2 weeks ago         1.84kB
Few cheatsheet commands for docker to try out
Start and stop the container -
$ docker stop <container_id>
OR
$ docker container stop <container_id>$ docker start <container_id>
OR
$ docker container start <container_id>
Remove images
$ docker rmi <image_id>Remove containers
$ docker rm <container_id>Check & remove dangling images
List:
$ docker images -f dangling=trueRemove: Remove Dangling Images, all Images and Containers.
$ docker images rmi $(docker images -f dangling=true -q)
$ docker ps -aq | xargs docker rm -f
$ docker images -aq | xargs docker rmi -f
Inspect Docker Container to get details of Docker like IP Address e.t.c.
$ docker inspect <container ID>Dockerize an Application
Create a Docker Image
We will see how to dockerize a simple REST service spring-boot application build via Gradle (If you don’t know how to create one, please click here)
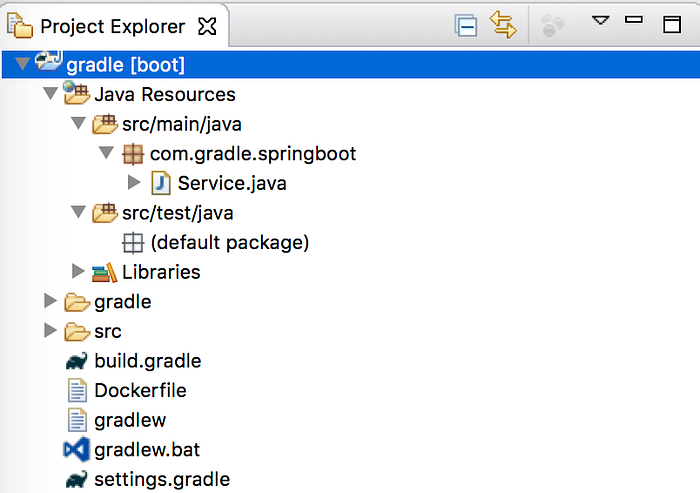
I have a Gradle Spring-boot application as shown below and have created a Dockerfile inside the project without any extension.
Add below snippet to the docker file
FROM java:8VOLUME /tmpEXPOSE 8080ADD /build/libs/<jar_name.jar> <docker_jar_name.jar>ENTRYPOINT ["java","-jar","spring-boot-docker-1.0.jar"]
FROM — image name.
VOLUME — Command for mount a directory.
EXPOSE — Set a specific port to listen by Docker Container.
ADD — uses for copy files.
ENTRYPOINT — allows you to configure a container that will run as an executable.
Build a Docker Image
Build the Docker image using following commands including the dot.
$ docker build -f Dockerfile -t <docker_image_name> .-t – for tagging the image. (in my case tag is spring-boot-docker)
-f – point to a Docker file location
Using docker images command check all Docker images. In my case i have following
$ docker imagesREPOSITORY           TAG      IMAGE ID      CREATED            SIZE
spring-boot-docker  latest   4c46f96846e7  18 seconds ago      658MB
hello-world         latest   725dcfab7d63   2 weeks ago       1.84kB
java                 8       d23bdf5b1b1b  10 months ago       643MB
And if you run docker container ps -a you can see only hello-world container is running as we have not yet run the image created above (spring-boot-docker) which will instantiate the another container.
Run Docker Image
Run the Spring Boot application using this command, mapping your machine’s port 8080 to the container’s published port 8080 using -p
docker run -p <machine_port>:<container_port> <Docker_Image_Name>
$ docker run -p 8080:8080 spring-boot-docker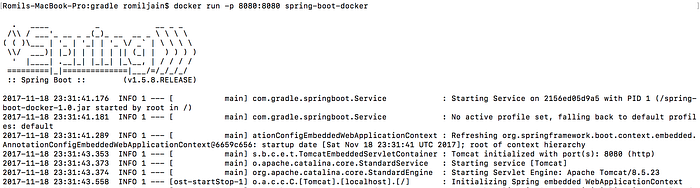
Finally, test the REST api using the http://localhost:8080/ Or use curl command as below
$ curl http://localhost:8080/
Greetings from Gradle Spring Boot Application!$ curl http://localhost:8080/hello?name=Romil
Hello Romil
Now if you run docker container ps -a you can see another container running spring-boot-docker application

In case if you want to run this image in detached mode
$ docker run -d -p 8080:8080 spring-boot-dockerShare your Image
Login with your Docker Id. If you don’t have a Docker account, sign up for one at hub.docker.com. Make note of your username.
$ docker loginTag the image
docker tag image username/repository:tagexample :
$ docker tag spring-boot-docker itsromiljain/springboot-repo:1.0Now if you run docker images you will see

Publish the image
$ docker push itsromiljain/springboot-repo:1.0Pull and run the image from remote repository
$ docker run -p 8080:8080 itsromiljain/springboot-repo:1.0It will run the application and you can test it using the http://localhost:8080/ Or use curl command
In Part-2 We will dockerize REST Spring-boot application with Hibernate having database as MySQL.